
|
What are pine trees? Pines are trees with whorled branches (Figure 1) and resinous sap. Their "leaves" are clusters of two to five needles, but they occasionally have more or less needles per cluster (fascicle). The trees bear cones and have a seed under each scale of the cone. There are about 100 pine species and positive identification requires examining the vascular pattern in the needles cross section and details of the cone scales. Pines are divided into groups with one vascular bundle, haploxylon, or two vascular bundles per needle diploxylon.  Why use pine trees for bonsai? Pines are considered by many to be
at the top of the bonsai prestige ladder. While they are slow
to achieve perfection, once there they are easier to maintain
in peak condition. Pines require less routine maintenance than
is demanded by many plants, such as the junipers. Pine needles do not disfigure or burn easily and thus may be displayed in good foliage in late summer when many other species bear scorched leaves. Some pine species normally have blue or yellowish needle color. Ponderosa, White pines, and Jack or Lodgepole pine, to name a few, do not have dark green needles. Pines
scientific and common names How do pines grow? In late spring dormant buds set from the previous summer begin to swell and elongate. These new elongated areas are called candles. (Figures 2, 3). As the weeks go by the candles continue their elongation and also harden off new needles. Once the needles harden the candle's elongation is completed. By late summer the new candles will set terminal buds that will be the growth point for the following spring (Figure 4) . In milder climates some pines may show two growth flushes a year, while in most northern areas of the United States only one growth spurt is likely. Under ideal conditions, Japanese black pine, Jack pine, and Lodgepole pine may show two separate growths a year. 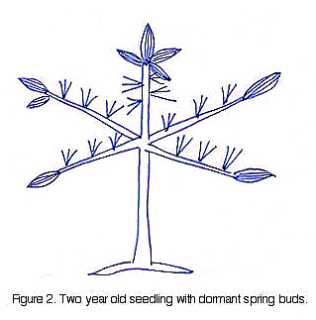 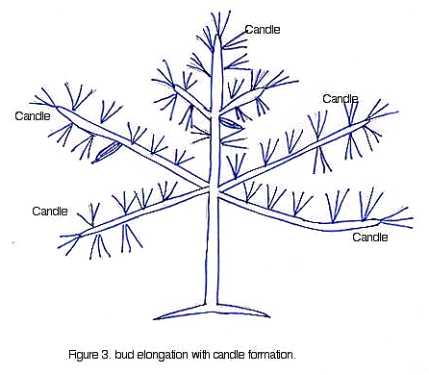 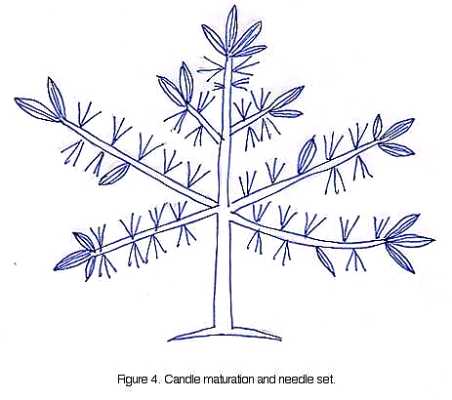
How are pines trimmed? In general, a pine may be trimmed at any time of year. When trimming a large branch or shortening the trunk, leave a stub and do not cut deeply into the trunk. This will prevent overgrowth and thick callus formation. The residual stub may be cut off in three or four months and smoothed over without excessive overgrowth. Cut paste may provide the same protection. Branches should only be shortened back into the needled portions. Never trim past the green needles as the branch will probably not resprout (Figure 5). Pines will not only grow reliably from existent buds or from latent buds hidden in the green needle clusters. Most pines will not sprout new buds from wood older than five years. On older growth, grafting is the only reliable method to get foliage into bare areas. 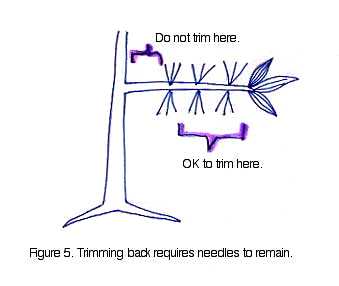 Another excellent rule is never to trim off more than 20% of the tree's needles ­ or more than one large branch a year. If you exceed this limit you may have a dead pine or one whose growth is retarded so severely that it should not be styled for several years or until its vigor returns. A vigorous container grown pine may be trimmed more severely than a collected tree or a field grown specimen, but always err on the side of less cutting. Pines grow most strongly at the tips of branches and towards the top of the tree. Thus to balance the tree's vigor and appearance, it is necessary to discourage the to top the tree and the tips of the branches while encouraging the inner and lower buds. This is easily accomplished by pruning the top of the tree and tips of branches more than the other areas. Over years of cultivation, remove whorled branches and ultimately leave only one or two branches from each whorl. In the bottom one-third of the pine do not remove any branches until there is good taper, and/or there is strong "knobbing" occurring. By knobbing I refer to the development of significant bulge from the trunk where several branches emanate (Figure 1). Some pines knob easily and early and should be watched carefully to prevent this development. Leaving one branch per whorl usually will eliminate knobbing. While some advocate using pruning pastes on pines, I do not use any sealants as the plants seal themselves off with their resinous sap. I have never seen a branch "bleed to death," regardless of when or how the cut is made. How are pines cultivated? The best advice to anyone hoping to grow pines in containers is "easy does it." In their natural habitat pines thrive on sandy and depleted soil where other trees would find it difficult to survive. In our climate most pines grow only once a year; therefore, they are light feeders. Drainage for pines, as expected, should be excellent. Soggy soil probably kills more pines than any other single problem. Full sun is a must for robust growth and health. Pines grown under partial shade tend to be yellowish in color, susceptible to insects, and the needles are long, soft and floppy. When judging a pine's condition, look at its physical appearance and then feel the needles for good stiff texture. A healthy pine should have firm stiff needles. Never buy a pine whose color is off what is expected of that species. A poorly colored pine is frequently terminally ill or dead. Mycorrhizae are soil fungi found associated with pine roots. These fungi are beneficial to pines and help the pine to receive nourishment on depleted soils. To encourage pines to develop mycorrhizae, sprinkle soil from a pine that has a good white net of fungus in the soil and place it into the soil of one that you would like to be "involved". Wet soils will not encourage good mycorrhizae development. Excellent soil aeration and some organic material in the soil helps the fungus establish itself. Pines can and do live normally even in the absence of grossly visible mycorrhizae. Pines resent heavy root pruning and manipulation; so keep root work to a minimum. As a general rule, root prune pines lightly at four to six year intervals. Trim off very long roots to a length that can fit into the new container. If there are few and long roots, then trim the roots back slightly and fold or circle them into the container; continue to shorten the long roots over the next several pottings. Newly collected pines are not root pruned, but all roots are kept and coiled around in the training container. Again, the long roots may be trimmed back over several repottings. Pines are not salt tolerant. Do not over fertilize with strong inorganic chemicals, and never, ever, fertilize a dry pine. The use of organic materials such as blood meal, bone meal, or cottonseed meal alone or in combination allows a gradual release of food to the plant without the worry of burning the tree's roots. I normally use organic material applied on a monthly basis in April through September. Organics do tend to have the drawbacks of being messy, smelly, and attracting flies. Fortunately, these traits do not bother the trees. I apply the material as a cake form or straight out of the bag to the corners of the pot. The material, however, will kill moss directly underneath it. Relatively few insects bother healthy pines. A dormant oil spray in the late fall and early spring keeps the pines clear of many insects, and this material is probably environmentally safer than many other insecticides. The oil works to smother insects and their eggs before they can get a strong foothold. Needless to say, treat any insect infestation when it appears with the appropriate material and use precautions for safety. How are pines trained? Any weak or newly collected pine is never trained, trimmed or wired. Pines that are collected or field grown will not be trainable for one to three years after initial potting. It takes this long to get the new tree healthy. Five needle pines are weak growers and should not be trimmed unless very healthy and their shape demands trimming. Container grown plants are often suitable for training from the start. At least two inches of growth at each bud is necessary before considering a pine to be healthy. Dwarf forms are slower growing and cannot be kept to the two-inch rule. Two needle pines are stronger and can be more aggressively manipulated. Even so, a two needle pine is never branch or root pruned as severely as an apple or maple tree. A general rule of thumb is never to prune roots or branches of a pine more than twenty per cent of its total foliage or root mass. How can needles be shortened? The long needled pines are frequently manipulated to make the needles shorter and to shorten internodes. This technique is applied mainly to two-needled pines. Five needle pines are weaker and should not be subjected to the same treatments unless one is expert in their manipulation. Techniques for two-needled pines include: 1. Needle cutting. In this technique, scissors are used to cut all needles shorter the day before the show. The cut needles will brown at the ends in several days and not be showable. 2. Candle trimming. In spring as the candle elongates, it may be shortened by candle trimming. Candles are either cut with scissors or candles may be twisted off at the desired length. This serves to shorten the candle, the internodes, and the needle length. This trimming is modified by the location of the candle, the vigor of the area, and the length of growth desired. Candles located at the top of the tree or towards the tips of branches are most vigorous and will need to be cut back from one half to two thirds their length, while buds on the lower branches and the interior of the tree are weaker and may require only one-third or less of their length to be cut back. Modify trimming as needed to balance each zone's vigor. In addition, if a branch is to be thickened or lengthened, allow it to grow untrimmed for several years. Then cut it back to proper length when its size is appropriate. 3. Bud removal. Buds may be removed completely in spring prior to candle elongation. Spring bud removal is utilized to shorten needle length and reduce the candle's length. By removing the buds formed from last year's growth, the tree must form new buds and to grow them later than the spring growth spurt. This later growth is never as vigorous. Thus by debudding the tree in spring, the new growth will be later, smaller and less vigorous. Note Pinus leucodermis is one pine that will not regrow in the same year as it is debudded. Ponderosa pine also will not grow the year it is debudded. On branch tips with multiple buds, the largest bud is removed and the weaker buds are allowed to grow. Again this serves to reduce the vigor of the bud pruned area. A very weak area or one with a single bud is not debudded. 4. Container growth. As a tree is container grown over a period of years, the needles reduce in size. However, the year after transplanting the new needles will be larger. 5. Needle pulling. To balance a tree's vigor, various sequences of needle removal have been published. There are too many techniques to discuss here at length. Suffice it to say that the needle removal techniques result in less overall energy production by the tree, but may be used to discourage the upper and terminal portions of the tree, which grow most strongly, and encourage the interior buds on the branches. This is really the same strategy as candle shortening described above. More needles are allowed to remain on the weaker areas, while stronger areas are discouraged by less needle retention. Needle pulling creates a tidier tree by removing older needles that are different in size from the current year's needles. Thus the tree shows more uniform needle size. Needle pulling also stimulates hidden or latent buds to grow and produce new branchlets. This of course increases the ramification of the tree and the appearance of maturity is enhanced. 6. Fertilizing. Holding back on the fertilizer until after the new crop of needles has hardened off will help to keep the needles shorter. Fertilizer applied before the needles harden produces longer needles. 7. Conclusion. I do not worry about needle reduction until the tree's maturity is sufficient to warrant the effort involved. A developing pine requires all the chlorophyll and leaf mass to stimulate vigorous growth. Needle reduction is important to give better bonsai proportions to a tree that is ready to be displayed. Other pine growing suggestions 1. Not infrequently, a pine may show some reverse taper. A quick cure may be possibly if the pine has a rough outer bark. By pulling off the loose scaly outer bark in the bulging area, the thickness can be reduced. Do not remove or cut into the cambium layer, only the outer corky layers are removed. 2. Frequently a tree has heavy branches that are not in scale with the overall proportions. On deciduous materials these heavy branches are removed and a smaller one will frequently pop out of the cambium near the cut. Since the pine will not pop a new branch you must cut the heavy branch back to a small sub-branch. You can hide the thick base with foliage. Over time this branch will be kept restricted in growth while the other branches are allowed to grow vigorously and thicken. This serves to 'thin" the once overly heavy branch. 3. Wintering pines. Most pines are hardy and will tolerate Midwest conditions if grown directly in the ground. Pines in containers will require winter protection for the roots. This may be done by digging a hole and submerging the pine container in the ground and mulching the tree up to the first branch. Keep wintering pines in an area that is not in direct sun. Trees marked with an asterisk on the list of pines require extra cold protection in the northern tier of states. 4. In winter the pines are dormant and require no light. My pines spend five months in complete darkness in a coldframe from November until April. when the coldframe is opened in April the trees are green as when they were enclosed in November. Dormant plants of any type must be adequately watered and not allowed to dry out. What techniques are suitable for displaying pines? 1. Pines look best in non-glazed
containers of subdued color. Straight-sided containers, whether
oval, round or rectangular, seem to work well. Summary of pine growing tips
|